
The Calven presence agent allows you to enable smart presence-based automations to help optimize your office - without installing any new hardware.
The presence agent uses your office's "network fingerprint" to determine whether employee devices are connected to the network and therefore present at the office.
You can also enable desk-based presence automations by using Calven's desk mapper to detect presence at specific desks based on the connected monitor.
Getting started
Table of Contents:
- Download and deploy the agent
- Configure fingerprints for your offices
- Check that the presence agent is running
Deploying the agent with registration keys
Once you've downloaded the presence agent, you'll need to bundle it together with a registration key. Calven uses the agent's registration key to identify each agent as part of your organization.

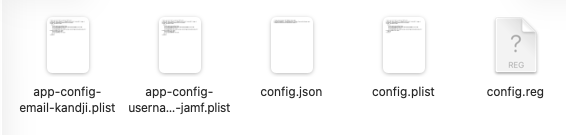
First, an Admin should navigate in Calven web to Settings - Integration - Presence Agent - Keys tab (https://app.calven.com/admin/integrations/presenceagent/about). Use the Generate New Key button to download your latest key. When you download the key, the following files will be included:
Once you have the key files downloaded, here's how to package them with the application in order to install the agent on MacOS and Windows devices:
For MacOS Devices:
- Download the agent (MacOS)
- Create a folder with only the application (.pkg file) and the key (config.plist) file in it
- Open Disk Utility (located in /Applications/Utilities/)
- Go to File > New Image > Image from Folder (or Image from Disk)
- Select the folder (or disk) containing your files
- Choose a location and name for the new .dmg file
- Click save
- Install the new .dmg file on the MacOS devices you'd like to capture presence from
For Windows Devices:
-
Install the application (Calven Agent Installer.exe) on the Windows device you'd like to capture presence from
-
Before running the agent: copy the Windows version of the key (app-config.plist) to c:\program files\Calven\Calven Agent on the devices you've installed the agent on
-
However it's recommended to use Registry Keys (.reg file included with the Registration Key download) which are:
-
Registry keys are all in HKLM\Software\Calven\Calven Agent
-
RegistrationKey - set this to the registration key value from config file
-
Endpoint = set this to the agent endpoint value from config file (Default is https://svc-au1.calven.com/integrations/devices/v1/presence-agent)
-
ShowIcon - Optional if set to string 'true' then enable the tray icon (same as command line option)
-
AllowQuit - Optional if set to string 'true' then quit option is shown on the tray icon (same as command line option)
-
Version - The currently installed version e.g. 1.0.6.4
-
-
-
-
Run the Calven agent from the start menu
-
Once the agent is installed on a device, you'll see that device and the logged-in user appear on the Agents tab in the Integration within Calven web.
Tip: Calven recommends enabling the tray icon via the registry setting during the initial rollout, in order to simplify access to diagnostic information (if required for troubleshooting). The policy to hide the tray icon can be updated at a later date if desired.
For MDM software distribution tools (JAMF or Kandji)
Refer to MDM instructions.
Configuring office fingerprints

The presence agent uses configurable fingerprints to identify the unique network conditions that indicate a user’s device is present at an office. When an agent determines that its network conditions matches a fingerprint, it will send a presence event for that user. This presence event is used to drive analytics and other automations in Calven.
On the Fingerprints tab in the presence agent integration in Calven web, you'll see a list of your offices. Click on the add/edit button to configure the rules that will trigger a presence event for an office. Each office can have multiple rules, and each rule can have multiple conditions.
For a rule to be met, all of it's conditions must be met.
If any of the rules for an office's fingerprint are met, a presence event will be triggered by the device/agent that met the rule.
To create a fingerprint rule, you can choose from the following conditionals:
- Internal IP for your network must match a specified CIDR Range
- External IP for your network must match a specified CIDR Range
- Device MAC address must be pingable on your network by the presence agent
- Web content matches a specified URL that the agent can connect to (and optional text string on that URL that the agent can read)
- A TCP connection is possible between the presence agent and a specified host on a specified port. An optional text string can be specified which the agent must be able to read within the port.
Launching and troubleshooting the agent

Once the agent is installed on a device, you'll see that device and the logged-in user appear on the Agents tab in the integration within Calven Web.
Use the Agents tab to troubleshoot issues like whether or not each agent is active on the user's device, or when the agent last sent a presence event for an office.
You'll also be able to see the fingerprint version being used by each agent, and the version of the agent itself. If an agent does not have the latest fingerprint, or the agent itself is an outdated version, it may not work as intended.
FAQ
When and why should I generate new keys?
You will need to generate at least one key so that you can register agents to your tenant.
The keys you create in Calven Web are used to automatically register deployments of the Calven agent with your tenant. Any machine that has the key will be able to register, and as such it is best practice to rotate which keys you use for registering new devices in case the key is lost or if it is accidentally made public. Your key rotation process should follow your general security practices around key rotation.
What is best practice for fingerprint rules?
For a fingerprint, you want to be fairly certain that the rule will only match when the user is in that physical location.
- If you are matching on an external IP address of your office, make sure to exclude VPN users from that rule.
- You can find the external IP address of your location if you don’t know it by going to https://www.ipify.org/ - however unless you are guaranteed a static IP by your internet provider, that address can change.
- Internal IP address range rules should always be used in combination with other rules, since private IP address ranges are re-used in many other locations. For example, 192.168.1.xxx is used in most home networks around the world.
- When you don’t know or cannot guarantee the external IP address, the “Web content matches” and “TCP connection possible” rules are great ways to leverage existing devices’ unique characteristics. However you do need to be aware whether those devices are reachable from remote VPN users.
What are good examples of fingerprint rules?
The fingerprint rules we have created as a way to determine where the user is located based on existing network conditions. The rules are flexible enough to handle typical offices and coworking locations, even ones where you don’t control the network environment. Here are some common use cases for the fingerprints:
- Office or coworking location where you know the external IP address(es). If you know the external address, that is a simple rule to follow, and you can just enter the external IP rule type with the known address range. Sometimes you will need to exclude users that are VPN’d into the office, and you can do that by adding an additional negative rule on the internal IP address range for your VPN.
- Coworking locations with printers or other smart devices. Go to the login page for a specific device and find a unique string like the model number. You can then use “Web content matches” to search for that model number.
Can you fingerprint a network based on the SSID?
No, as permission to read the SSID requires explicit permission from the user on some devices.
When does the agent send presence events?
The agent will only send presence events on the first fingerprint match of the day, or when the user has changed locations. It will also only send presence events when the device is unlocked and the mouse has been clicked at least once that day. This way the agent can guarantee that the device trigger is real and not that someone left their device on the desk overnight.
What happens if two offices have overlapping fingerprint rules?
The first fingerprint match will be reported and the other will not, so this should be avoided. It indicates a general problem, because if the fingerprints overlap then they are not unique.
What happens when two users use the same laptop?
Each agent is created based on a combination of device serial # and logged-in user. So if two users utilize the same device, there will be two agents reported in the table, each reporting individual user information.
Can the same user have two laptops?
Yes, a user can have multiple laptops with presence agents. Each laptop will report presence for the user and you will see both in the agent table.
What happens when a user upgrades to a new laptop?
When a user receives a new laptop, you should deploy the agent to that laptop via your corporate app deployment mechanism. Once you see the new laptop reporting presence, you can de-activate the agent on the older laptop.
Does the presence agent work with desktop computers or just laptops?
The presence agent does work on desktop computers as well as laptops.
Does the presence agent work with the mobile app and Chromebooks?
Currently the presence agent only works on Mac and Windows.
How does Calven know which Calven user is logged into the presence agent?
The agent will try to automatically determine which user is using a laptop via several different methods. The Calven Agent knows the username of the currently logged in user on the device, and it will attempt to match the username on the device to the user in Calven. If the username cannot be matched, then the agent will report no connected user in the agent table. You can manually assign the agent to a user on the device or within settings in Calven web.
Does the Calven agent support In-place updates?
Yes, In-place updates are supported.
How does Calven protect my privacy?
Calven takes user privacy very seriously and protects it by implementing best practices for data security and privacy. Here are a few items of note:
- Privacy by Design - The fingerprint matching is done locally on the device and when a network fingerprint is matched, the device only reports to the Calven service the username, fingerprint rule # and the timestamp of detection. No other information about the network leaves the device.
- Data Minimization - Calven collects from the device only the amount of data required to determine that the user has been in the office on a day.
- Accountability - Only global administrators and IT admins can view the individual timestamp attendance information for troubleshooting purposes, all other administrators are limited to aggregate attendance information
How to troubleshoot if a user is in the office but doesn't have a green tick?
Calven Admin should perform the following steps:
- Check the Activity Log —> Presence Events; this will show if presence events have been captured for the user; check the day in question as well as historic dates.
- Check recent activity of the Presence Agent for the user via Integrations —> Presence Agent; sort by device username to identify the person; check if their device is on the most recent version (and ideally consistent with others who have been classified as checked-in and receiving green ticks); check the time of last presence event and contact.
- Ask the person if they used their regular device in the office and logged in as normal for the day in question.
- Raise a support ticket for the Calven team to investigate further
What data is collected?
Presence Agent captures the Employee Username, Location ID, Timestamp and Device Serial Number. If optional "Monitor Identification" is enabled it also sends the Monitor Serial Number(s), which are immediately discarded after being used for mapping.
Is it continuous tracking?
No. The scope is limited to a single "presence event" upon arrival, triggered by a network change or a monitor being plugged in, and only when the device is unlocked and active. It is not designed for intrusive monitoring or excessive data collection.
Does it track login times, or hours on machine, in and outside the office?
No. It reports a timestamp only for a presence event detected at a recognized office. A site-specific fingerprint (e.g. an IP address range) is used to verify presence only at a recognized company location. It does not capture when a person leaves the offices, and does not track login times outside the office.