
Table of contents
- Create an office
- Add a floor
- Design your floor plan
- Add/edit desks and neighborhoods
- Set up rooms and points of interest
- Allocate space to groups
- Track your edit history
- Publish your floor plan
- Make edits to your floor plan
- Plan big changes with scenarios
- Manage changes and versions
- Configure booking cadence, rules and settings
Create and set up an office
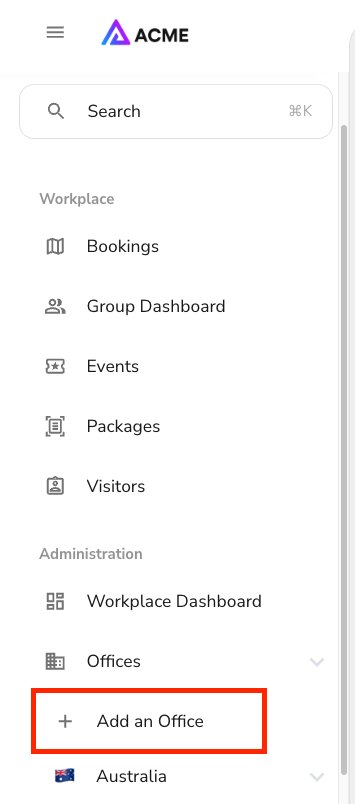
Before you can start booking, space planning, or capturing analytics, you'll need to set up your office(s) in Calven Web. To create a new office, use the add an Office button in the locations section of the sidebar:

When creating an office, you'll be prompted to set up a few things at the start:
- Name and short name (short name is used when abbreviation is necessary - we recommend a maximum of 3 characters)
- Category refers to whether the office is company-managed or a coworking space
- Address is used to determine the office's timezone and help users and visitors find directions when needed
- Booking enabled determines whether users have the ability to set their working location to this office - we recommend leaving this disabled until you've finished the rest of the office setup
Creating your floor plan
Calven uses interactive floor plans to give you the best possible experience around desk booking and floor plan editing. To create a new floor for your office, please email support@calven.com with the following:
- A .png, .jpeg, .pdf, or .dwg file for the floor(s) you'd like to create
- The names of the floor(s) you'd like to create
- The office that contains this floor(s)
Using those assets, our team will add your office's floor plan into Calven and notify you as soon as it's ready.
Coming soon: convert your own floor plan without intervention from our team, by drawing it right in Calven!
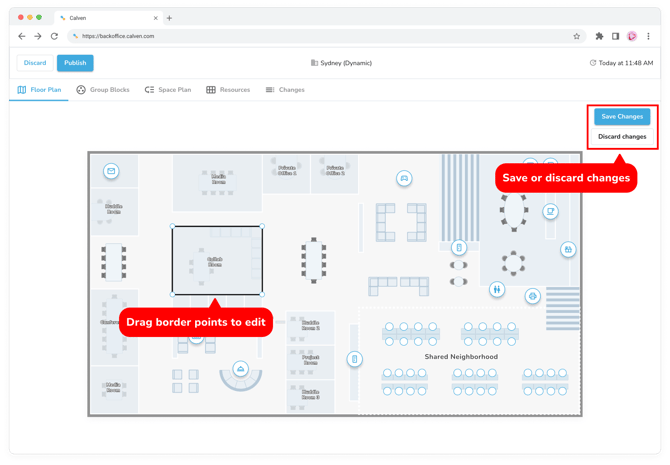
Designing your floor plan
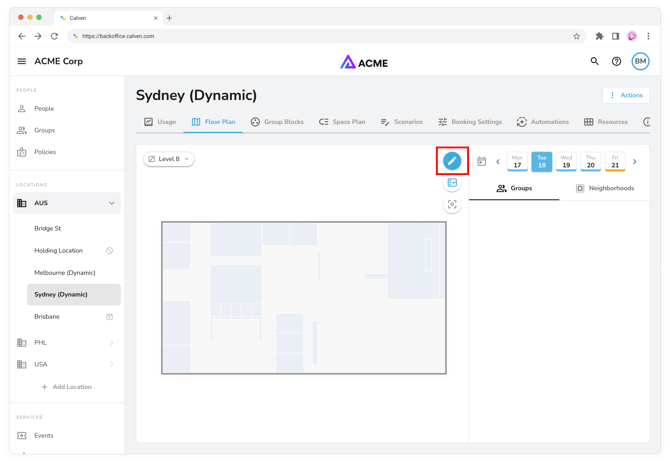
Once your floor is ready, you can use the edit button to open edit mode and start adding desks, neighborhoods rooms, points of interest, and more:
Once you've entered edit mode, you can edit the layout of your floor plan and start adding desks, points of interest, and other details:

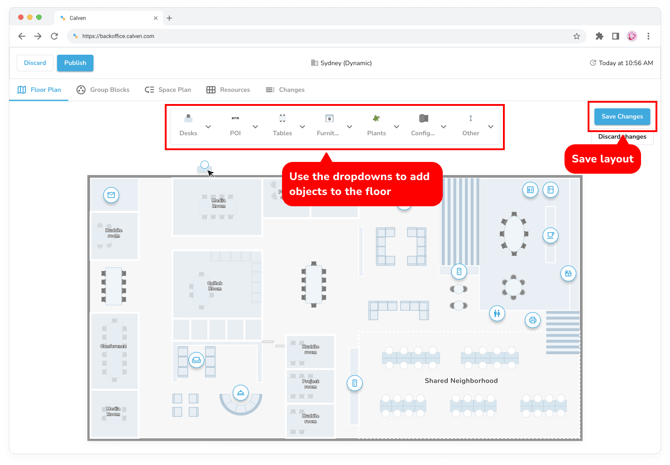
After you've finished designing your floor, press save changes to save the layout.
Saving a layout does not create bookable desks - in order to make desks bookable, you must also create desk resources and link them to the objects on the floor plan. Keep reading for more information...
Adding bookable desks and neighborhoods
After drawing desks on the floor plan, you'll need to configure them as bookable resources and link them to the objects on the floor.
You can always add and configure desks and neighborhoods one by one, but we recommend using Calven's bulk upload feature to get started.
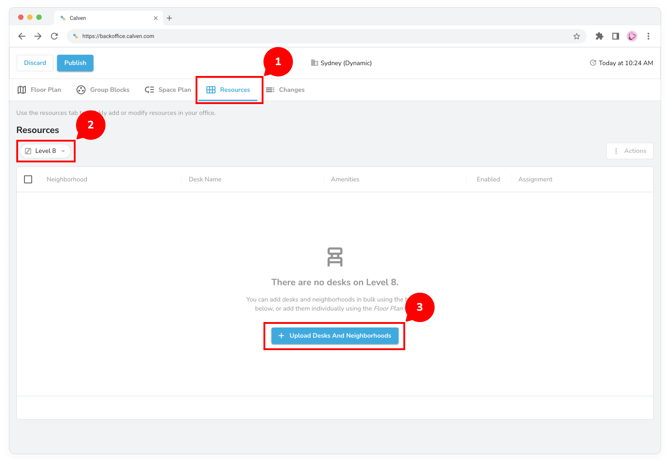
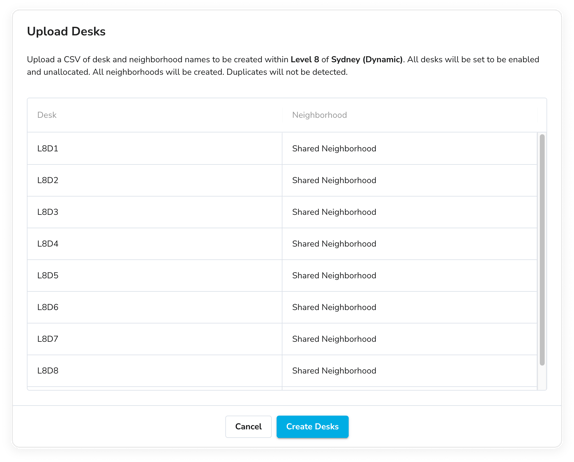
To do so, navigate to the resources tab in the editor and with your empty floor selected, use the upload desks and neighborhoods button to bulk upload a CSV:
Calven will prompt you to upload a CSV with 2 columns:
- Desk name - each unique name will create a desk
- Neighborhood - each desk must be grouped into a neighborhood
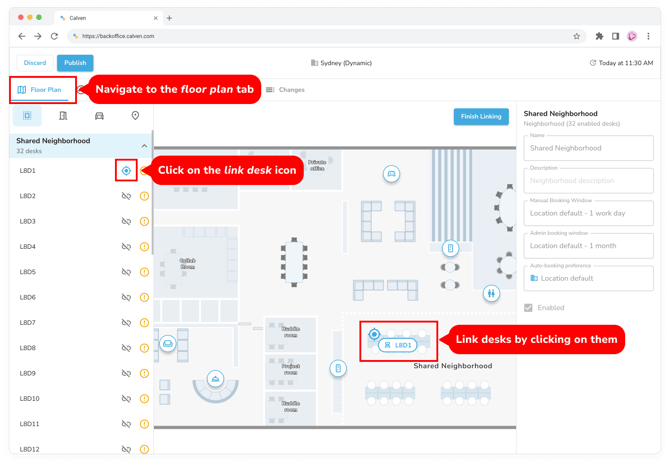
Once you've created your desks and neighborhood resources, you can link them to the objects on the floor plan, which will allow users to interact with them visually once the floor has been published.
To do so, navigate back to the floor plan tab and click on a desk in the sidebar to begin linking. After you link the a desk, Calven will automatically select the next desk, allowing you to link multiple desks in quick succession:
Once you've published your floor plan with desk and neighborhood resources, desks will be bookable by users.
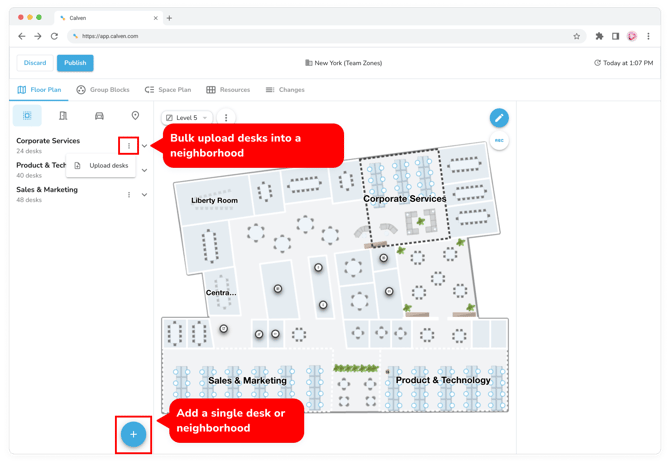
You can also use the floor plan tab to add desks and neighborhoods one by one, or bulk upload desks into a neighborhood:
Desk properties and bulk editing
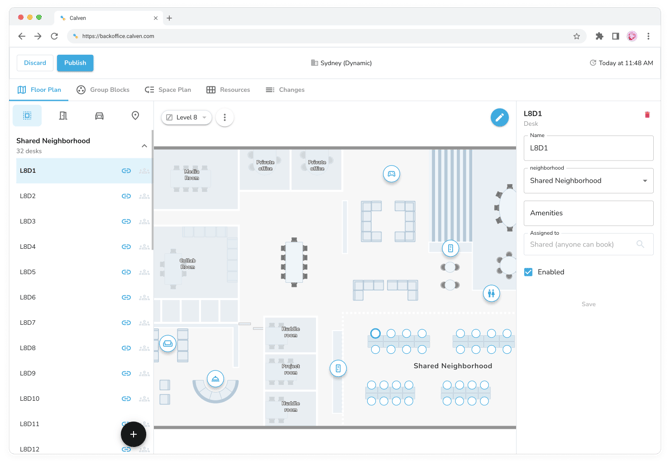
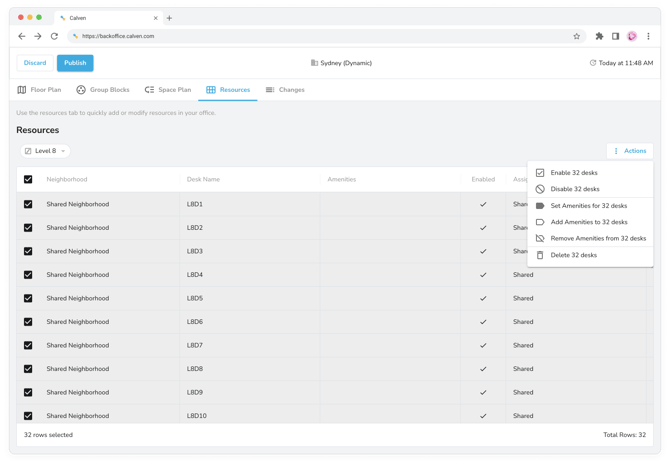
For each desk, you can add amenities which will be displayed to users on the floor plan, and choose whether to assign a user to the desk. Use the enabled checkbox to enable/disable booking for specific desks:
You can also perform bulk actions like enable/disable and editing amenities, via the resources tab:
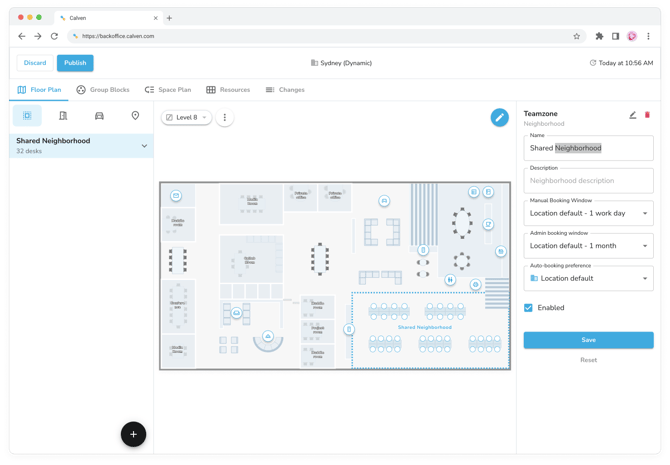
Neighborhood properties
You can click on a neighborhood in the sidebar of the floor plan tab to edit it's name, description and more. One of the key features of the Calven neighborhoods is the ability to set custom booking windows:
- Manual booking window refers to how far in advance users can book this neighborhood via the floor plan
- Admin booking window refers to how far in advance administrators can book desks (for themselves and others) via the floor plan
- Auto-booking preference refers to how Calven will allocate desks when auto-booking users in this neighborhood:
- Location default will preserve the same value set by default in the booking settings for this office
- Individual favorite desks prioritizes booking individuals at the desks they frequent, rather than directly next to group members in the same neighborhood
- Team togetherness prioritizes booking individuals at desks near group members in the same neighborhood
In offices that use Calven's legacy desk booking algorithm (manual favorite desks):
- Change the booking level for each neighborhood from individual desk to neighborhood, allowing users to book space in the neighborhood without designating which desk specifically (not available in the current algorithm)
If you have questions about your office's specific configuration, contact your desk booking administrator or Calven Support.
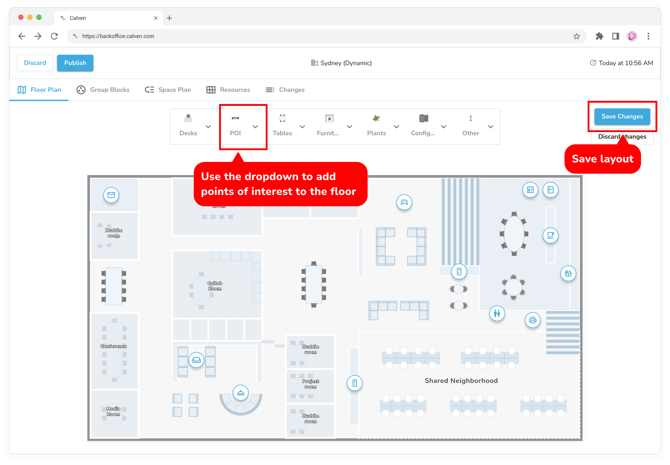
Rooms and points of interest
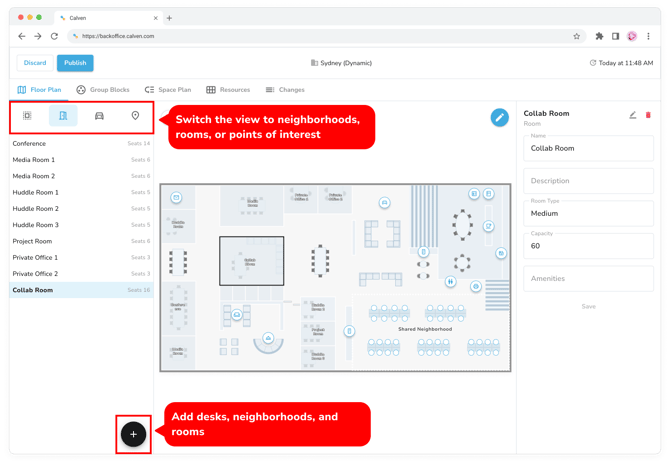
Rooms and points of interest are other resource types configured via the floor plan. Use the tabs at the top of the sidebar to choose which resource type you're viewing. You can add new resources via the add button at the bottom of the left sidebar.
Rooms
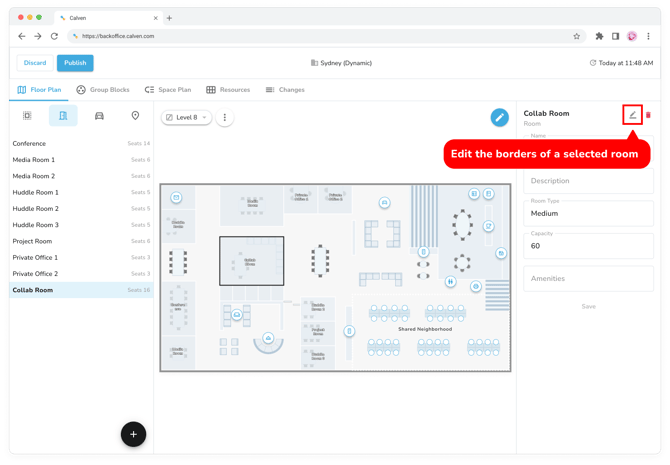
With a room selected, you can edit it's name, description, type, booking capacity, and amenities - all of which will be visible to users when they select the room from the map.
You can also use the edit button next to the room's name to draw the room on the map:
Creating rooms on the floor plan will allow users to view, but not book. To make your rooms bookable via Calven, you must connect the room resource Calendars via their respective integrations. Learn more:
Points Of Interest (POI)
Points of interest, unlike other resources, can only be added via the floor plan layout editor. Once you've added points of interest and saved your layout, you'll be able to see them in the sidebar and edit their names and descriptions.
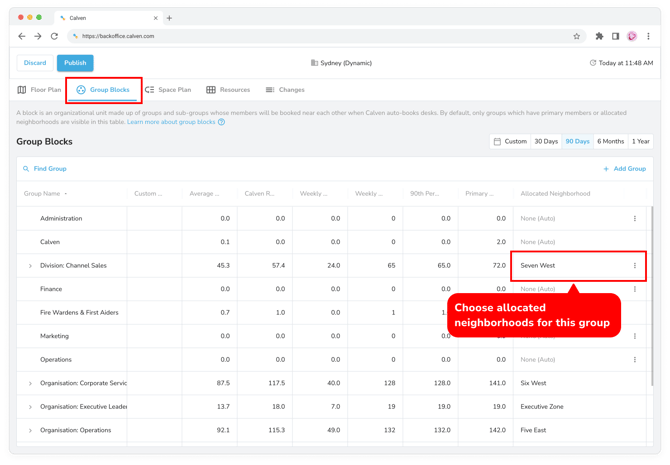
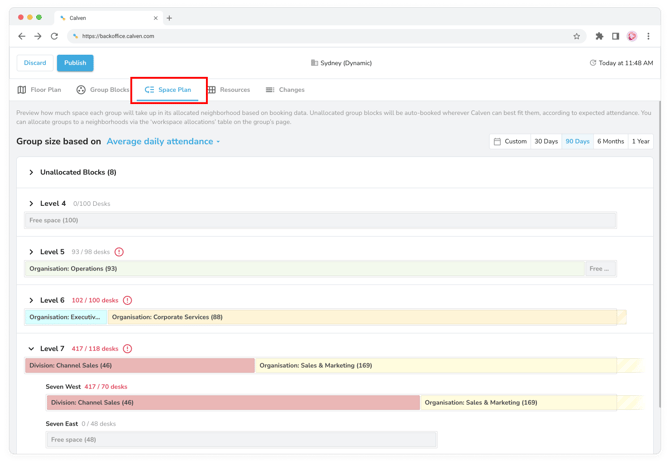
Allocating space to groups
After you've designed your floor plan and set up desks, you can start allocating space to groups in your office in order to plan which groups will be auto-booked in which neighborhoods.
To view the groups which can be allocated to neighborhoods for auto-booking, navigate to the group blocks tab in the floor plan editor.
A group block is a unit used in space planning to make sure the right people will be booked at desks near each other in the same neighborhood, when Calven auto-books your office. As Calven learns from your booking habits, group blocks will display real attendance data for each group based on historical bookings and presence, as well as the neighborhood each group has been allocated to.
You can also use the space plan tab to toggle between different attendance metrics, and preview how much space your groups will take up in each neighborhood and on each floor:
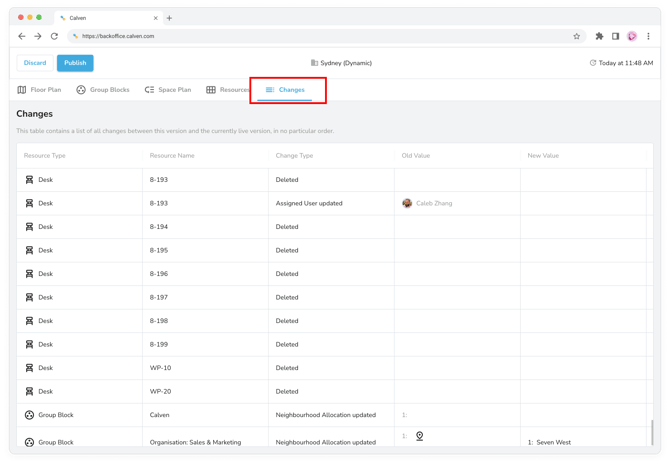
Tracking your edit history
If you've lost track of the changes you've made while editing, navigate to the changes tab for a full list of what's different between your current draft and the live office:
Publishing your office
Once you're comfortable with the floor plan and space plan you've set up, use the publish button to make them live for all users.
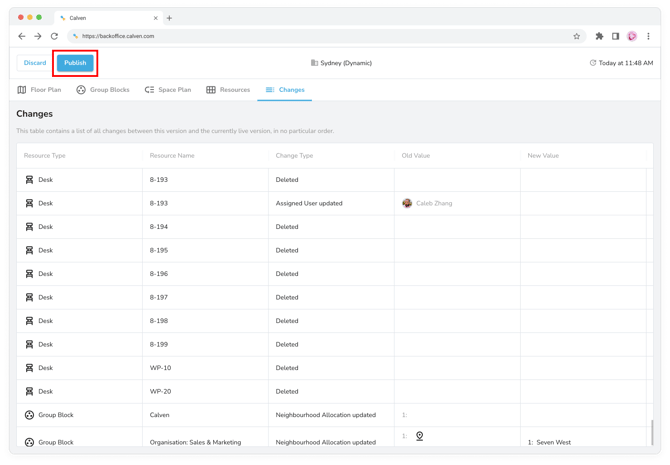
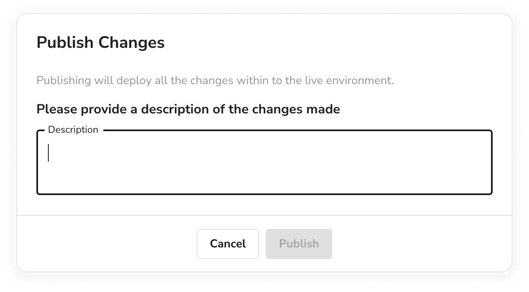
Calven will prompt you to add a description of the changes you've made. This description will help anyone viewing the version history for this floor plan to understand what's changed at a glance.
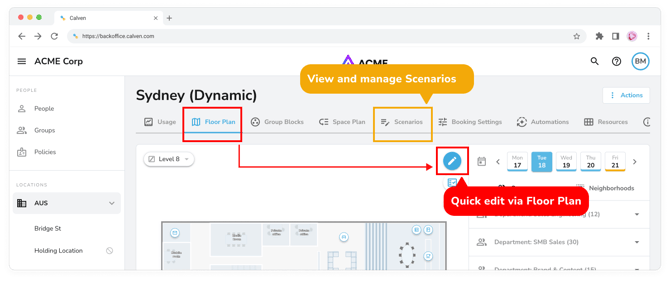
Making quick edits to your floor plan
After you've saved your floor plan, you can always make changes at any time. For quick changes like assigning a user to a desk or changing a group's allocated neighborhood, you can use the edit button on the floor plan tab:
Note: limitation when making regular edits via the Floor Plan tab, you will not be able to save your progress as a draft.
Scenario planning
For making larger edits or scheduling changes over time, we recommend using scenario planning instead of regular edits. Note the differentiation between quick edit via Floor Plan and Scenarios:
Explainer video for Scenario Planning:
Scenario planning is a great way to plan out larger or longer-term changes to your office when you need to save drafts, iterate, and test different configuration options.
Each scenario is a different iteration of your office - containing a configuration of your floor plan, group blocks, space plan, and resources.
The term live scenario refers to the currently published configuration of the floor plan, group blocks, space plan, and resources.

When you create a new scenario, Calven duplicates the live one (including floor plan, group blocks, space plan, and all other configurations from the floor plan editor) and creates a draft version that you can edit without disrupting the live configuration.
Clicking into a scenario display all of it's previous versions. You can use the buttons at the top right to edit or publish:

When you're editing a non-live scenario, use the close button to save your changes:

When saving changes, Calven will prompt you to add a description of what you've done:

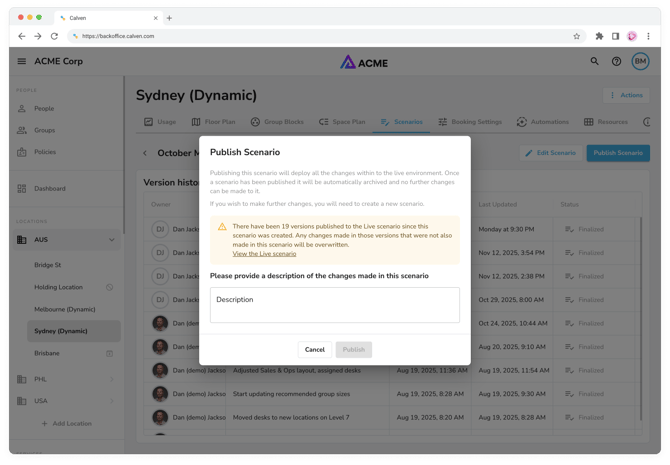
When you're ready to publish a non-live scenario, use the publish scenario button. Publishing a new scenario will fully replace everything in the live scenario with the new configuration, and archive the live scenario, meaning you'll no longer be able to make changes to it.
Version and change management via scenario planning
Each scenario has a list of versions to help you understand changes that have been made over time, and compare it with other scenarios. You'll see the list of versions when clicking into a scenario, as well as a description of changes made, who made them, and whether anyone is currently editing.
If you're about to publish a scenario that was created from an outdated version of the live scenario, Calven will give you a warning:
Configuring desk booking rules and automations
Once you've published your floor plan and resources, it's important to think about the cadence on which you want desk booking to happen: learn more about booking settings
