Set up catering in your office
How to set up Calven catering in your office and allow employees to send orders straight to the kitchen
Background
Catering menus that appear within the Calven app can be configured in Backoffice, allowing administrators to create, edit and schedule different catering suppliers and menu items.
Configuring a Supplier
Suppliers are the “stores” that users can order from in the Calven app. Creating a new supplier can be done from ‘actions’ button on the Catering page. The initial supplier configuration is complete when the supplier is saved for the first time.

Once the supplier has been created, details and additional fields can be edited.
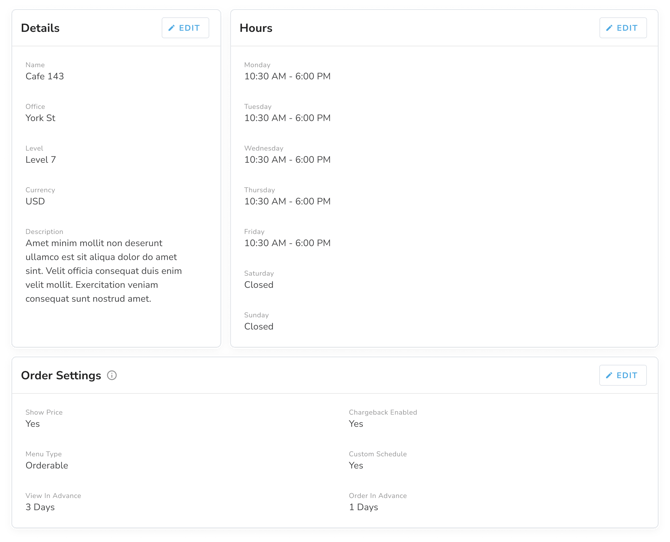

Order settings and how they work
|
Field |
Description |
|---|---|
|
Show price |
When set to “yes”, when a user views an item on the menu, they will be able to see the price of the item. The price is set on the item. The currency for the whole supplier is configured under the supplier “details” section. |
|
Chargeback enabled |
When set to “yes”, a user will be required to enter a chargeback code (cost code) when they place an order. See Cost codes |
|
Custom schedule |
When set to “no”, all items that are enabled on the items page will be available for ordering. When set to “yes”, the items will only be available for ordering as configured in the “menu”. |
|
Menu type |
When set to “orderable” the items can be ordered. When set to “not orderable” the items can be viewed but not ordered, for example if you want to show employees what is available for lunch but they don’t have to order ahead of time. |
|
View days in advance / order days in advance |
When “custom schedule” is set to “yes” then these two fields will be available. These configure how far ahead a user can view/order items when selecting days in the future. If the menu type is set to “not orderable” then only “view days in advance” will be shown. |
Item categories
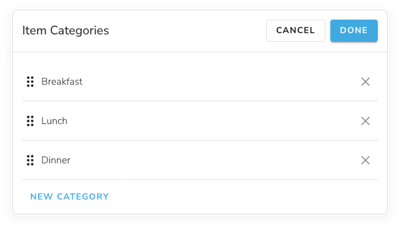
Adding categories to a supplier allows administrators to place menu items in these categories. The order that categories appear in the mobile app can be edited by dragging categories up or down in the ‘item categories’ list for the supplier.
When creating or editing a menu item, the categories available at that item’s supplier can be toggled on or off. Items are then grouped by category in the mobile app.
Supplier Catalogue
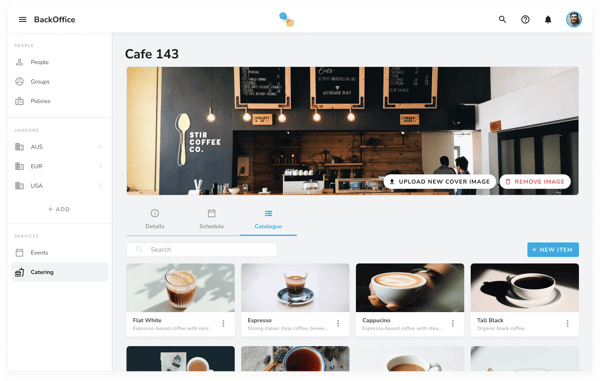
Each supplier has a catalogue of menu items that can be scheduled, modified, or added to another supplier. Note that adding an item to another supplier creates a separate version of the item, and item categories are not shared from one supplier to another.

Configuring Menu Items


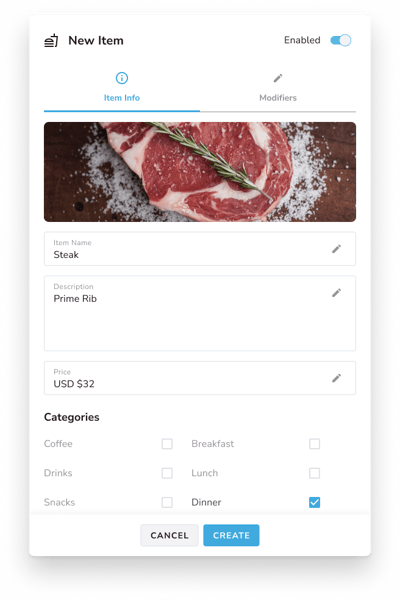
Items can be setup on the items page.
|
Field |
Description |
|---|---|
|
Image |
The image must be a minimum size of 334x233 |
|
Enabled |
If enabled, the item will be available for ordering. If disabled, it will not be available for ordering. |
|
Item Name |
Name of the item shown |
|
Description |
Detailed description that will be shown to users when viewing it |
|
Price |
Price of the item. Whether or not this is shown to the user who is ordering, this will be saved on the order for analytics. |
|
Categories |
Which of the categories configured on the supplier that this item belongs to. This item will appear on the menu for all categories selected here. |
|
Dietary tags |
Three dietary tags are available that will be shown on the menu item for both employees and backoffice configuration.
 |
|
Delete |
This will permanently delete the item from the supplier. Note that the information about the item will still be available for analytics. |
Configuring Item Modifiers
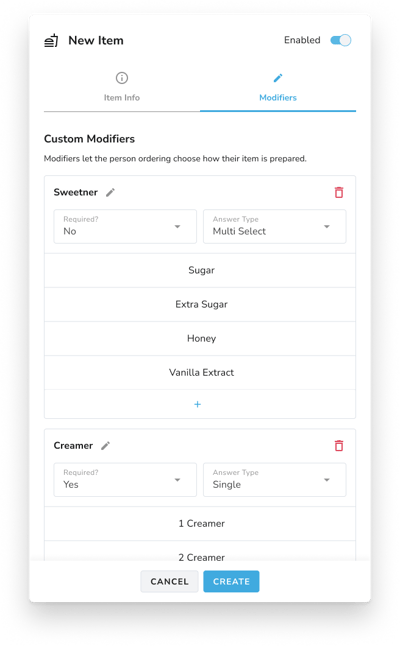
An item can have configurable options that are selectable when ordering. These options can be single-select or multi-select.
|
Field |
Description |
|---|---|
|
Answer type |
Single select (pick one) or multi-select (pick many) |
|
Name |
The name for the option that is shown to the user |
|
Options |
The option names that are available to pick from |
|
Add modifier |
Add a new modifier to the item |
Scheduling Menus
Scheduled menus can be configured on the “schedule” tab. This tab is only enabled when “custom schedule” is set to “yes” for the supplier. This screen allows admins to configure both a default, recurring menu for the supplier (Default Menu), and also add items on specific one-off dates (Current Menu).
Note that menus can only be configured for days of the week when the supplier is scheduled to be open.
Scheduled menus can be setup using two methods:
-
Items can be configured to appear by day of week (e.g. Monday, Tuesday)
-
Items can be configured to appear or disappear on a specific day (e.g. October 21, October 22)
These two methods can work together to achieve more complicated real-world scenarios.
For example: if a supplier typically has hamburgers on the menu on Tuesdays, but they have run out of hamburger buns just this week, then they can alter the schedule on Tuesday October 21 to remove hamburgers and add hot dogs in its place.
Default Menu
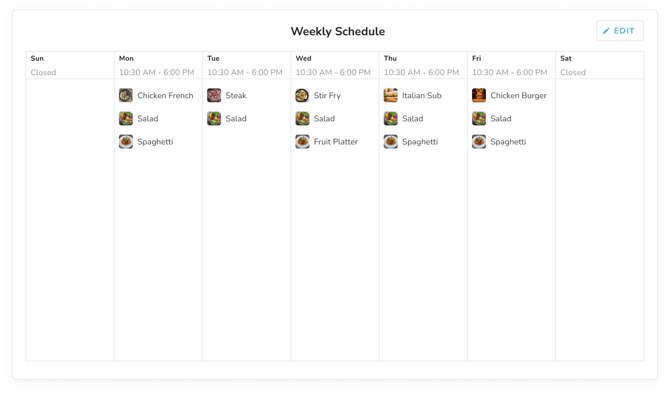
The default menu is a set of recurring items that will be available by default each week. Changes made to the default menu will be reflected on all future weeks after the current one.

Current Menu
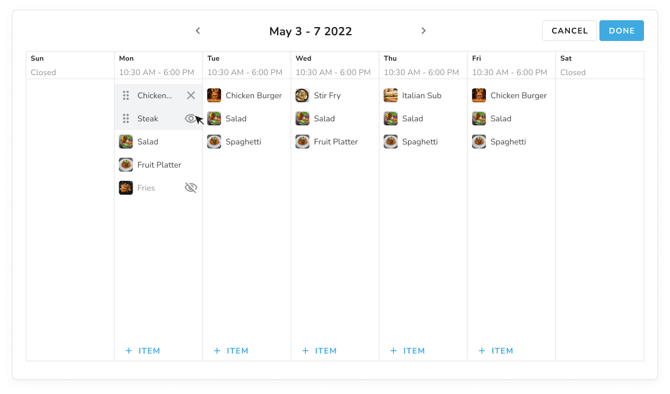
The current menu is the scheduled set of items for a selected week. By default, the current menu is always the same as the default menu. When configuring the current menu, items can be added to each day individually, in addition to the default menu items.
Default items can be toggled off for any day on the current menu without affecting the default menu. Items added to a day on the current menu can always be removed.
When adding to the menu, admins can add an existing item from the catalogue, or create a new item on the spot.

Setting up a barista kiosk
The Calven Queue iPad app allows supplier operators to view and manage incoming orders.
Requirements and installation
Hardware Requirements
The Calven Queue app requires an iPad running iOS 15.6 or later. The app will adapt to different iPad screen sizes; however, an iPad Pro is suggested due to its larger screen size. While the app will work on an iPad mini, and this may be an attractive option where space is limited, the small screen size may pose a problem for the operator.
Calven Queue requires Internet connectivity via Wi-Fi or cellular access.
Calven Queue can optionally print order tickets. Printing requires an 80mm receipt printer. The printer must be connected to a network where the iPad can open a direct TCP/IP connection to it. While any printer that supports ESC/POS should work, we recommend the Epson TM-82IIIL or a similar printer from the Epson range. A wired Ethernet connection is preferred where available, but Wi-Fi interfaces are available. If a printer with Wi-Fi cannot be sourced, an adapter such as the TP-Link TL-WR902AC can be used.
Software installation
Calven Queue is available as an unlisted app on the App Store. Opening the URL https://apps.apple.com/us/app/calven-queue/id1610020311 on the iPad will show the Calven Queue App Store page and allow installation. There is no charge to install Calven Queue. An Apple App Store account is required. App updates will occur via the standard App Store update process.
Set up
Opening Calven Queue will show the login screen - Any Calven user can log in to Calven Queue. The organisation’s standard SSO process will be used.

After logging in, the list of configured catering suppliers is shown. Select the supplier that this iPad is being used for or log out with the button at the top right.

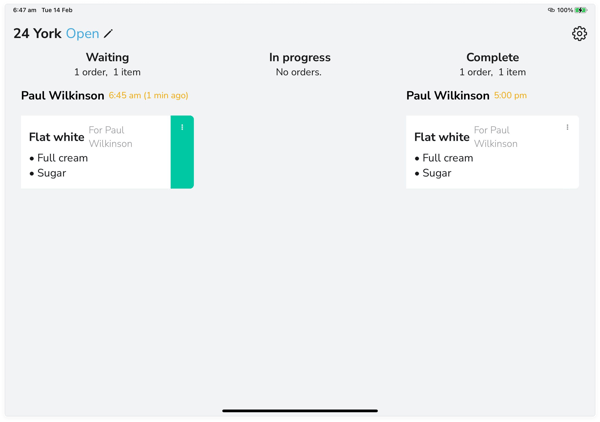
The main order management screen will now be shown. By default, there are three columns. The first shows incoming orders, sorted in order of required delivery time. Tapping or dragging an order allows it to be moved to the second, ‘Processing’, column. Once an order is complete it can be tapped or dragged into the ‘Complete’ column.
Items can also be dragged back to earlier columns; For example, if an item needs to be re-made it can be dragged from “complete” back to “waiting”.
The vertical … menu allows orders to be cancelled and to re-print order tickets.
From this screen, the supplier can be opened and closed using the ✎ icon in the title bar.
The ⚙️icon opens the settings screen.
If the iPad is unable to connect to the Internet, then a red error bar will be shown at the top of the screen.
Errors communicating with the printer are also shown on this screen.
 \
\
The settings screen allows you to set up printing, supplier hours of operation and customise the appearance of Calven Queue.
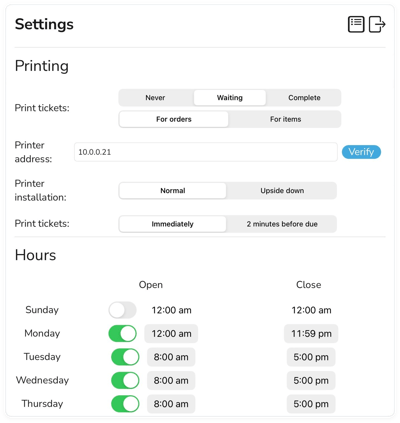
|
Setting |
Purpose |
|---|---|
|
Print tickets |
|
|
Print tickets |
|
|
Printer address |
The IP address or hostname of the ticket printer. |
|
Verify button |
Send a test print job to the printer. |
|
Printer Installation |
This setting affects the printing of tickets such that they are orientated correctly when they come off the printer.
|
|
Print tickets |
|
|
Hours of operation |
Allows editing of which days the supplier is open and the open hours. Note that the mobile app only allows orders to be placed when the supplier is “open” on the main screen. It is possible for the operator to close the supplier (and thus prevent orders) or open the supplier (and thus allow orders) from the main screen independently of the hours and days listed here. |
|
Show “processing” column |
This setting allows the middle, ‘processing’ column to be hidden. Orders then progress directly from waiting to complete. |
|
Report wait time |
The mobile app can show the average wait time (from waiting to complete). If this switch is turned off, then these statistics are not reported nor shown. This switch would typically be turned off for suppliers where a long time is expected between order and completion (e.g., a dinner service where orders are placed during the day). |
|
New order sound |
There is a choice of two different sounds to be played when a new order is received. |
|
Auto close and Auto open |
Turning these options on and selecting a time allows the open/close state of the supplier to be changed automatically as long as Calven Queue is open on the iPad screen. For example, if a supplier closes at 3pm, the auto-close time may be set to 2:58pm to ensure that no orders are received after this time. |
Cost Codes
Cost codes are used to assign costs to specific areas of the business, even when an employee is not directly charged themselves. These are sometimes called chargebacks, as the cost for the service provided is “charged back” to a specific business unit and their P&L.
Viewing cost codes
Cost codes can be accessed by clicking “Cost codes” on the sidebar in backoffice. Each code has three fields: the code itself, a friendly name and whether it is enabled. Only enabled cost codes can be used for ordering food through the mobile app. Disabled codes are stored for historical records, but can be re-enabled at a later date by importing a new CSV with those codes enabled.
Cost codes cannot be edited within Calven once the CSV is imported, they are meant to be imported from a financial software export and then remain static until the new codes are imported.
The cost codes can be exported as a CSV, so if a user need to edit the cost codes manually, they can export the codes as a CSV and re-import them.

Uploading cost codes
Uploading new cost codes is the only way to edit the codes.

Two fields in the CSV are required - code and name. Enabled is optional and will be assumed to be true if it is blank.
Once the CSV is uploaded, the fields will be shown and can be edited by the user in the browser. Any validation errors will be highlighted for the user to correct before uploading.
Any cost codes not in the imported CSV will be marked as “disabled”. This is done so that a new import from finance software of the current codes will automatically disable old cost codes not in the finance software export.
Uploading the chargebacks CSV can take up to 60 seconds depending on the number of changes. An indicator is shown to the user to let them know the time requirements.
Cost codes cannot be duplicates, they must be unique. Any duplicates will be highlighted in the CSV import modal and will need to be addressed before the upload can be done. Cost names can be duplicates as they are just used for friendly naming.

Ordering catering with chargebacks
When cost codes is enabled on the supplier, then the user ordering catering will be required to enter a billing code for the order when ordering.
The user cannot press the order button unless the billing code has been entered.
The code can be searched by either the cost code or the cost name as shown in the video below. Only enabled codes can be used.
-gif.gif?width=300&height=649&name=ezgif-com-gif-maker%20(19)-gif.gif)
